
We see a support level being established which was broken later. Price rallies back to the support line to retest it for resistance, which makes it an ideal price level to short targeting the most recent minor support level. The following chart shows a double top formation, which is very clear to the eye. This kind of precision is something that requires a second or even a third look at traditional charts. After the double top was identified, sell positions could be initiated near the support targeting the rest of the price action. We have many confirmations.
The shorts would be continued to kept open as long as future bearish Renko bricks continue to form, with stops trailed one or two Renko bricks above price. As price shows signs of reversal by forming bullish Renko bricks and closing near the 5 EMA, the short position could be closed with some decent profits to be made.
Renko charts are very easy to understand and it is simple to understand price action trading with Renko charts.. Any trading method that you currently use to Candlestick or line or bar charts can be very well applied to Renko charts, as long as the strategies are not time dependent.
renko chart patterns | Anna Coulling
Recommended by ProfitF :. Trading Forex, Binary Options - high level of risk. Please remember these are volatile instruments and there is a high risk of losing your initial investment on each individual transaction. The chart below shows how the typical Renko chart looks like. Configuring the Renko Chart The Renko chart can be configured to adjust the box size.
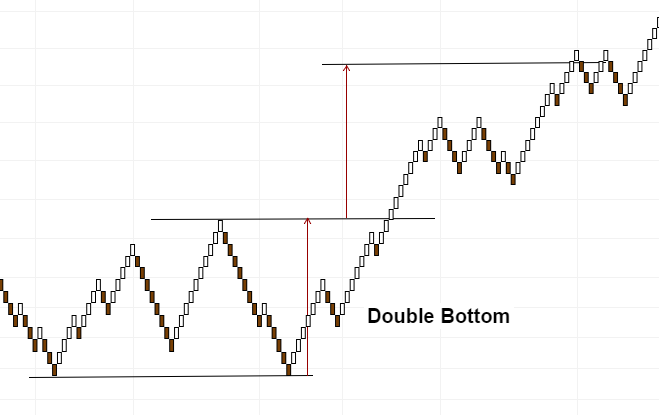
How does the Renko Chart work? Why trade with Renko Charts? Renko charts are pure price action based charts. Simple Renko Trading Strategies There are many Renko trading strategies, but here we outline a few of the simplest Renko trading strategies that traders can use. Renko Trend line break Trading The chart below shows how a trend line break method can be applied to the Renko chart. Renko Support and Resistance Trading In the following chart, we notice how the support and resistance lines are easily spotted on the chart.
Renko Chart Patterns Trading The following chart shows a double top formation, which is very clear to the eye. Conclusion Renko charts are very easy to understand and it is simple to understand price action trading with Renko charts..
- Renko chart mt4, free renko charts software download!
- Day Trading Renko Charts — a Profitable Approach to Trading!
- no forex fee credit card canada.
- forex audio news feed.
Shouvik Roychoudhury says:. Add your review Cancel reply Your email address will not be published. Holy grail of Forex trading. Forex Demo vs Live account. The first step in building a Renko chart is selecting a box size that represents the magnitude of price movement. A Renko chart is then constructed by placing a brick in the next column once the price has surpassed the top or bottom of the previous brick by the box size amount. Once a brick is drawn it is not deleted. Renko bricks are not drawn beside each other. While a fixed box size is common, ATR is also used.
ATR is a measure of volatility , and therefore it fluctuates over time. Renko charts show a time axis, but the time intervals are not fixed. One brick to could take months to form, while several bricks may form within a day. Increasing or decreasing the box size will affect the "smoothness" of the chart.
Decreasing the box size will create more swings , but will also highlight possible price reversals earlier. A larger box size will reduce the number of swings and noise but will be slower to signal a price reversal.
Renko charts are effective in identifying support and resistance levels since there is a lot less noise than a candlestick chart. When a strong trend forms, Renko traders may be able to ride that trend for a long time before even one brick in the opposite direction forms. Trading signals are typically generated when the direction of the trend changes and the bricks alternate colors. For example, a trader might sell the asset when a red box appears after a series of climbing white boxes. There is a brief pullback, marked by a red box, but then the green boxes emerge again.
Given the strong uptrend, this could be used as an opportunity to enter long. Consider an exit when another red down box forms. After the uptrend, a strong downtrend forms. A similar tactic could be used to enter short.
The Roadmap To Successful Trading + Best Curated Resources
Wait for a pullback marked by the green up box. When a red down brick forms, enter a short position, as the price could be heading lower again in alignment with the longer-term downtrend. Exit when up brick occurs. These are sample guidelines. Some traders may wish to see two or more bricks in a particular direction before deciding to enter or exit. Heikin Ashi charts, also developed in Japan, can have a similar look to Renko charts in that both show sustained periods of up or down boxes that highlight the trend. While Renko charts use a fixed box amount, Heikin Ashi charts are taking an average of the open, high, low, and close for the current and prior time period.
Therefore, the size of each box or candle is a different size and reflects the average price. Heikin Ashi charts are useful for highlighting trends in the same way that Renko charts are.
- Trading Renko Charts – Keeping It Simple.
- forex oriental cargo tracking.
- liquidez mercado forex.
- options trading selling.
Renko charts don't show as much detail as candlestick or bar charts given their lack of reliance on time. A stock that has been ranging for a long period of time may be represented with a single box, which doesn't convey everything that went on during that time.
Our Platforms
This may be beneficial for some traders, but not for others. Highs and lows are also ignored, only closing prices are used. This leaves out a lot of price data since high and low prices can vary greatly from closing prices. The use of only closing prices will reduce the amount of noise, but it also means the price could break significantly before a new box es forms and alerts the trader. By then it could be too late to get out with a manageable loss.
Therefore, when using Renko charts, traders often still use stop loss orders at fixed prices, and won't rely solely on Renko signals. Since this type of chart was designed to follow the general price trend of an asset, there can often be false signals where the color of the bricks changes too early, producing a whipsaw effect.
This is why it's important to use Renko charts in conjunction with other forms of technical analysis. Technical Analysis Basic Education. Advanced Technical Analysis Concepts. Your Privacy Rights. To change or withdraw your consent choices for Investopedia. At any time, you can update your settings through the "EU Privacy" link at the bottom of any page. These choices will be signaled globally to our partners and will not affect browsing data.